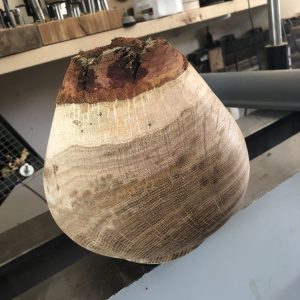
Turning Green Wood – an introduction
So, you’ve been turning seasoned blanks sourced from various suppliers, but you fancy something a bit more challenging. How about turning green wood, that is wood that has recently been felled and hasn’t been air or kiln dried? This opens up the opportunity to turn local wood species, unusual pieces like burrs/burls, and probably save money too! If you hear a chainsaw locally, go and ask the owner if you can have a look. It could be a homeowner who may be happy to donate some wood to you or it could be an arborist who is chipping everything anyway. They’re usually open to some bartering or even a freebie! Less for them to cart away.
Getting Started
I won’t be covering all the weird and wonderful techniques turners around the world have dreamed up to turn a lump of wood into something they can produce a blank. Let’s just consider the basics of the initial turning. At all stages dealing with green wood, think safety. I do not wish to be alarmist, just sensible. The fresh cut wood may have stresses and strains in it from felling, unseen cracks, loose bark and even excessive sap, all of which can produce flying missiles and hurt you. Protective outerwear and a stout face-mask are initial essentials (PPE).
The best starter technique is to turn your piece between centres driven by a spur drive and supported by a live centre. It is important you have good visible centre mounting points as we’ll be using these in part 2 for remounting the piece once initial drying has completed. The piece should have first been made roughly round by chainsaw or band-saw before mounting, again taking care and using PPE.
Initial turning should be at low speeds whilst knocking the edges off, just fast enough to have acceptable vibration in the lathe. This can be increased as the piece becomes more stable. Once round a chucking tenon should be formed at the headstock end. If you’re working on a large enough blank, turn a 4″ (100mm) approx tenon at this stage. We’ll use this tenon for rough shaping of the vessel and hollowing. Later, after drying the tenon may distort or even become oval. As we have made this tenon larger and retained the centre mounting point, the blank can be remounted between centres using a ball or large cone centre at the tail-stock end, and the tenon reduced to around 2″ (50mm) for the next size down set of chuck jaws.
Rough Turning
The piece should be mounted in the chuck jaws and supported by the tail-stock. With a bowl gouge (1/2″ ideally so it has some meat!) rough turn the exterior to an approximate shape for the final piece. This will be refined when dry. Depending on the wood species you may well have streamers of wet peeling come off the piece as you turn it or even sap as liquid spraying you! When this step is complete, you now need to hollow the vessel aiming to leave it with around 1″ walls. Again this allows us room to refine the shape when dry and remove any distortions to bring it back into the round.
Hollowing
There are many ways to hollow, but my preferred method is to drill a depth hole in the centre of the vessel to the required depth. This both gives us a starting point for the hollowing cuts but also gives you a depth marker so you know when you have bottomed out the vessel to the required depth. I prefer to use a Forstner bit of around 40mm often with an extension bar to reach the required depth. Some of the systems you might consider to aid hollowing are:
- Hope Easy Arm Hollowing Jig – link
- Hope 6 mm Mini Carbide Box Set – link
- Robert Sorby Hollowing Tools – link
- Crown Revolution Hollowing tool – link
- Woodcut Hollowing Tools – link
These systems all make the process easier. Make no mistake, hollowing is a more advanced technique and not only because you can’t see the cutter while cutting! If you can, try before you buy. No option is cheap, and you will find what suits one turner, doesn’t another. Some of the systems provide extra aids like laser or camera systems to aid you knowing where the cutter is internally and allow you to manage wall thickness without recourse to constant caliper checks. Most of the systems offer a variety of cutters, some designed for the swift removal of wood, others of a scraper nature to enable smoothing of the interior wall. Constant removal of the chips and streamers from the hollow with an improvised rake or an airline to prevent clogging.

Packing the piece for drying
When the rough turning is complete, place the vessel in a box or paper bag and surround and pack loosely with the wet shavings. Seal it and weigh it, recording the weight on the exterior. Put in a cool dry place and forget about it for a few months. You want it to dry slowly to minimize cracks and distortions. An inch thick vessel could take up to a year to dry, so patience is needed. Weigh the carton/bag periodically recording the value on the container. When the value stops reducing, you have reached an equilibrium point. Time for the final stage of turning and the creation of your finished piece!
Cleaning Up
After a session of green wood turning it is essential you clean off the lather bed and your tools. The sap can be sticky, acidic or just wet! None of which is good for steel and cast iron. After cleaning off, treat your tools to a protective coating of wax, mineral oil or commercial protective spray e.g. WD40, Axcaliber Dry Lubricant.
Look out for Part 2 when we complete the turned vessel.


